Installing SPF Foam Sealant as a DIYer
Do-It-Yourself (DIY) projects around the home can include small weatherization jobs using a convenient insulating foam sealant product in an easy to use, small can (typically 12-24 oz.).
Foam Furniture: Viral Social Media Trend
A new trend features consumers decorating/covering an array of household items including mirrors, benches, couches, shelves, and tables, with one-component polyurethane foam. It is important to follow applicable safe handling procedures, including proper ventilation and to wear appropriate protective equipment/clothing when using polyurethane foam. The intended use for one-component polyurethane foam is in a “bead type” application for air sealing of a home or building. Because one-component polyurethane foam in cans use a flammable propellant, precautions should be taken to minimize any potential for fire through accidental ignition in handling, storage and use. Read and follow all label warnings and cautions.
Other terms for this trend include: popcorn furniture, expanding foam furniture, cloud furniture.
Insulating foam sealants (also known as “foam in a can” or “one component foam”) are a type of spray polyurethane foam (SPF) product and are readily available at home improvement stores. These products are intended for use in a “bead type” application for air sealing or adhering. Their small volume, ease of use, and portability make them well-suited for smaller projects, such as sealing gaps and crevices, tackled by the DIYer.
It’s important to note that unlike insulating foam sealants that can be used by a DIYer and without specialized training, products called low-pressure two-component SPF (typically used on larger insulation projects and sold in kits or refillable cylinders) require training and certification. They are often used by weatherization contractors and SPF professionals.
Some DIYers occasionally express an interest in installing low-pressure two-component foam themselves. For more information, see our section for weatherization contractors/professionals. This section discusses a number of key issues, including training and personal protective equipment (PPE), including respirators, to consider before attempting pursuing a low-pressure two-component SPF installation project yourself.
When to consider hiring a professional
Insulating foam sealant products are sold in aerosol cans (typically 12-24 oz.) and designed for DIYers (and professionals) to fill smaller gaps and cracks around the home. They are not intended to be used as insulation for larger areas or projects. There are other types of spray polyurethane foams designed for mid- to larger size insulation projects.
For mid-size projects, there are low-pressure two-component kits that may require further training and specialized PPE to use them properly and safely. These low-pressure kits are primarily used by weatherization professionals and SPF contractors to insulate and seal small to mid-size areas around the home, such as attics, crawl spaces, and rim joists.
High-pressure two-component SPF systems are more often used when insulating larger areas, such as walls and roofs on new construction or major renovations. These products are not for DIYers and are designed for professional use. These systems require special training and the use of PPE, including respirators. When high-pressure two-component spray polyurethane foam insulation is needed, the use of a SPF contractor having the proper training, equipment and personal protective gear to handle these large-scale projects is important.
More information about finding a contractor can be found under the Selecting an SPF Contractor section of this site. The Spray Polyurethane Foam Alliance also provides information on how to find a contractor.
Typical uses for insulating foam sealant
Many home improvement centers and hardware retailers sell insulating foam sealant products in 12-24 oz. cans. These products are useful for small DIY projects such as sealing holes, gaps and crevices around your home where air leakage could occur. There are different grades of insulating foam sealants for different uses. Refer to the product label for information on appropriate product uses and check with the product manufacturer if you have questions about its intended use.
Some possible areas to consider sealing include around:
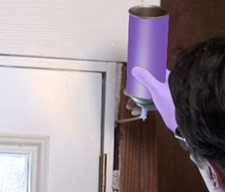
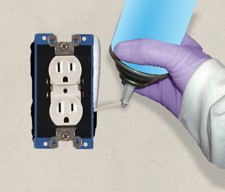
Living spaces (see above): Seal gaps behind baseboards, window and doorframes, wire and pipe penetrations, air vents, and around the sides of (not inside) electrical boxes.
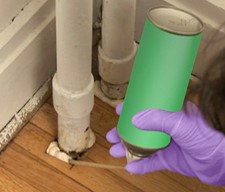
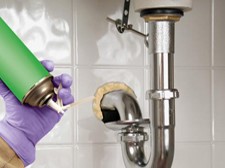 Sink plumbing: Seal by filling the gap between the wall and the pipe.
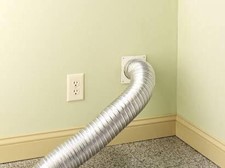 Dryer vents: Seal from either the interior or exterior of the penetration, depending on which has easier access.
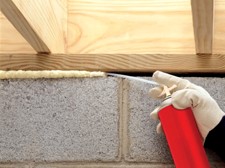 Sill plate: Seal around the wood framing of the walls of an unfinished basement where the wood 2” X 4” or 2” X 6” meets the poured concrete foundation wall.
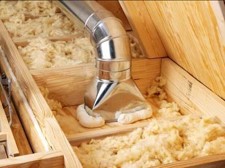 HVAC penetrations (attic registers): Seal between the penetration and duct work from the attic to the ceiling registers on the top floor of the house.
Other typical uses:
- Attic Hatch: Seal the attic hatch door from the living space by going into the attic and filling the gap between the frame of the attic hatch door and the attic floor.
- Basement/Attics: Seal pipe and duct penetrations, plumbing shafts and stacks, wall cracks, sill plates and floor/wall junctions.
- A/C wiring: Seal the gap between the pipe and the wall where the cooling line from the A/C condenser (look for a copper pipe) enters the basement from the outside of the house. It can be found near where the air conditioning unit sits on the ground.
- HVAC penetrations (floor registers): Seal between the gap around the floor registers and duct work in the basement.
Exterior uses
Insulating foam sealant is also effective for some exterior uses, such as:
- Where siding meets the foundation
- Electrical, gas and air conditioning penetrations
- Garage ceiling and wall joints, and
- Around outdoor faucets and vents
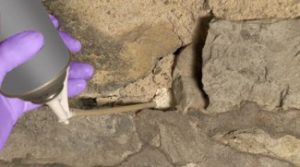
It can even be used in some landscaping applications, such as stone wall repair (image below).
- Securing landscape blocks, as well as for
- Pond and waterfall fillers and repair
Follow the manufacturer’s instructions for application. It can be helpful for exterior applications to paint the surface to be treated with black paint (appropriate for outdoor use and the surface selected) to help prevent UV degradation and discoloration of the foam.
Insulating foam sealant ingredients
A can of insulating foam sealant contains a group of chemicals referred to as a prepolymers, which is formed in the can when chemicals are added at the manufacturing site. These chemicals include polymeric methylene diphenyl diisocyanate (pMDI) and a resin blend that may contain a mixture of polyols, catalyst (primarily amines), hydrofluorocarbon or hydrocarbon propellant, surfactants and flame retardants. See the manufacturer’s label for specific product contents since they may vary slightly depending on the type of insulating foam sealant. When the prepolymer combines with moisture in the air, a reaction occurs to create the foam. Before the foam has sufficiently hardened, there may be potential for exposure to these chemicals. Therefore, it’s important to follow the safety precautions and wear the protective gear (e.g., glasses/goggles, gloves and full- coverage clothing) as described on the product label.
Guidance on using insulating foam sealant
Here are a few key considerations when using insulating foam sealant:
- Follow instructions on the product label: Read and follow all instructions on the product label carefully.
- Provide ventilation: Provide plenty of ventilation to avoid breathing vapors and mist until the foam has hardened.
- Wear appropriate protective gear: It is important that you wear protective gear, often referred to as “personal protective equipment” (PPE), when applying insulating foam sealant. Wear the clothing and eye protection recommended by the product manufacturer on the label. This can be safety glasses or goggles, full-coverage clothing, e.g., long sleeves, and gloves. Avoid getting foam on your skin or in your hair. (The foam is highly adhesive and very difficult to remove). Learn more.
- Keep children and pets away while spraying: Keep children and pets away from the area where you are applying the product during application and an appropriate time after.
- Shut off ignition sources: Be thoughtful about addressing potential combustion risks. Extinguish heat sources, sparks and open flames in the spray area, adjacent rooms and behind neighboring walls. This includes pilot lights to gas stoves, dryers, furnaces and water heaters. Keep the area free from ignition sources until fumes have dissipated.
Refrain from smoking while spraying the foam. - Avoid spraying in high heat areas: The unreacted chemical constituents in the can and the cured foam may be combustible, so you should carefully read the instructions on the product label and follow them with respect to avoiding installations in areas exposed to high heat, such as around fireplaces, heaters, radiators, heat lamps, recessed lighting, bare copper wires, or inside electrical boxes.
Note: Insulating foam sealants typically contain flame retardants and when installed properly, are designed to meet building and fire code regulations. Installed cured product is combustible and will typically begin to thermally degrade at temperatures above 240ºF/116ºC.
- Clean up the work area, including any foam trimmings: Insulating foam sealants generally do not need trimming, because the product is applied in a narrow “bead.” However, if you wish to trim the applied product, it is good practice to wait until the foam has cured or hardened before attempting to trim it. Consult the product label and instructions for trimming information and cure times. Cured or “hardened” foam trimmings may be disposed of as you would other household wastes. Be sure to thoroughly clean up the work area after the job is completed.
Note: Generally, it is considered acceptable to leave cured or “hardened” insulating foam sealant exposed when it is used to seal small gaps and cracks. However, in the unlikely event that it is used for larger area applications (e.g., greater than about 2 square feet), consider a consultation with your local building code official, or work with a professional weatherization or spray foam contractor, who understands local building code requirements for foam plastics.
Post-spraying guidance
Generally, people can reenter the area when the insulating foam sealant has hardened to the point where it is considered “tack free” (no longer wet or sticky on the surface). Typically, it can take between five and 60 minutes for the foam to become tack-free. Wearing appropriate protective gear (for example, eye protection, full-coverage clothing and gloves) will minimize exposure when checking the foam’s hardness or “tack-free” state.
The amount of time it takes for a foam to cure or harden varies depending on the product-specific formulation, temperature, humidity, the amount of foam being sprayed, and other variables. Typically, insulating foam sealants cure quickly at moderate temperatures and humidity. The foam surface cures first, and then gradually cures inside of the foam. The thicker the foam is applied, the longer it takes to cure throughout. Spraying a mist of water on the substrate or/and between layers of foam can speed up the curing process. Full cure may be reached in a time range of about eight to 24 hours, depending on the product and site conditions. Consult the product label and instructions regarding cure times.
First-Aid
Refer to the product label for first-aid instructions. Keeping the instructions on the product label unobstructed (clearly readable) at the project site helps in the event that first-aid guidance is needed.
Storage and disposal
Empty cans may be disposed of as non-hazardous household waste or recycled. For full or partially used cans of insulating foam sealant, follow the product label instructions regarding storage and disposal. The ingredients in the can are pressurized, so upright storage of the can at room temperature consistent with the manufacturer’s recommendations is important (avoiding freezing or hot temperatures). Remember that the temperatures in a parked vehicle in the summer can rapidly reach very hot temperatures, so plan your purchase and transportation of the insulating foam sealant accordingly.
After initial use, a partially used can of insulating foam sealant may be re-used for a limited time (typically up to 15 days) if stored in cool and dry conditions.
Disposal of full or partially used insulating foam sealant cans must be in compliance with all federal, state/provincial and local laws and regulations. Regulations may vary in different locations. Call the product manufacturer for instructions.